Turkish Lamb Shanks With Eggplant and Mushrooms
6 lamb shanks
1 large white onion, chopped
2 pounds white mushrooms, sliced 3 medium eggplants, cut in 1/2-inch thick slices
10 cloves garlic, peeled and sliced
2 teaspoons paprika 1 teaspoon black pepper
1 teaspoon kosher salt
1 8-ounce can tomato sauce
1 teaspoon chicken bouillon
Place lamb shanks in heavy sauce pan. Cover with water and cook on medium-low flame for 2 hours. Preheat oven to 350 degrees.
Peel every other slice of eggplant so that the final dish looks like stripes. Fry eggplant in olive oil until it is light golden brown and tender. Put eggplant on top of lamb so that it's completely covered. Fry onions and garlic until golden brown. Add mushrooms, garlic, paprika, salt and pepper. Combine tomato sauce and chicken bouillon with 2 cups water. Bring to boil; mix to combine ingredients; turn off heat. Place lamb shanks in roasting pan. Place eggplant slices on top of lamb. Spoon sauce over eggplant so that lamb is totally immersed in sauce. Place in oven for 1 hour. The sauce will be a golden color. Serve with white basmati rice. Serves six.
Source: Eti Cohen, chef-owner of Maxim's in Cherry Hill, Pa."
Thursday, October 06, 2005
Lebanese Hummus with Marinated Lamb a Sephardic dish
Lebanese Hummus With Marinated Lamb serves 6
For hummus:
2 cups dried chickpeas
1 cup tahini
1/2 teaspoon black pepper
11/4 teaspoons salt
11/2 tablespoons lemon juice
5 cloves garlic, ground in food processor
2 to 21/2 cups water
For meat:
1/2 pound lamb chops, first or second cut, meat sliced from bone
2 medium red onions, peeled and chopped
1/2 teaspoon dried oregano
1/2 teaspoon salt
1/2 teaspoon black pepper
1 teaspoon sumac (fruit-based Israeli spice, see note)
1/4 cup olive oil
2 tablespoons pine nuts
For garnish: 1 cup chopped parsley
1 teaspoon red pepper flakes
1 tablespoon olive, or more if needed
To make hummus, sift through chick peas, rinsing well and discarding pebbles or broken or discolored peas. In a large bowl, soak peas for 8 hours or overnight. Rinse chick peas; place in heavy soup pan with 2 quarts of water. Bring to boil; lower heat and simmer for about 11/2 to 2 hours or until very tender. Drain well, reserving cooking liquid. Cool slightly. Grind peas in food processor until smooth. (At this point, you can place chick peas in a freezer bag and freeze until ready to use. To defrost, take them out of freezer in the evening; in the morning, add rest of ingredients and proceed to make hummus.)
Place chick peas, tahini, ground garlic and spices in an electric mixer or food processor. Add 1 cup water and blend until very creamy. If it seems too dry, add more water.
Marinate lamb with onions, spices, pine nuts and olive oil and let sit overnight. Saute marinated meat, and cook until tender.
To serve, spoon hummus on a serving plate, spreading it so edges are thicker than center. Scoop out a circle in center of hummus. Place meat in center, sprinkle with parsley and pepper flakes. Drizzle with olive oil.
* For vegetarian dish, substitute mushrooms for lamb. Also, if sumac is unavailable, substitute an equal amount of finely grated lemon zest.
Source: Adapted from chef Ariel Kars and co-owner Patricio Felsenstein, Naomi Grill, Madrid, Spain, and Eti Cohen, chef-owner of Maxim's in Cherry Hill, Pa.
Chicken Tajine
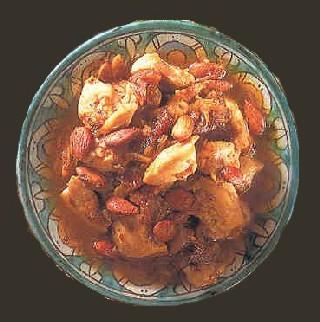 Chicken Tajine
a thousand year old dish it's sweet & savory stew
1 tablespoon olive oil
3 cups sliced Spanish onions
2 cloves garlic, coarsely chopped
11/2 teaspoons ground coriander
1/2 teaspoon ground cumin
1/2 teaspoon ground ginger
1 cinnamon stick
1/4 teaspoon saffron threads
2 teaspoons brown sugar
11/2 teaspoons salt
1/2 teaspoon freshly ground black pepper
1 3-pound chicken, cut in quarters
2 teaspoons honey
1 tablespoon freshly squeezed lemon juice
3/4 cup pitted prunes
3/4 cup whole blanched almonds
Oil for sauteing
1/2 cup Spanish green pitted olives
Preheat oven to 350 degrees.
In a large skillet with a heat-proof handle, heat the oil.
Add onions, garlic, coriander, cumin, ginger, cinnamon stick, saffron, sugar, salt and pepper. Cook over a medium flame until onions are light golden brown. Add chicken; turn to coat with onion mixture. Continue cooking until chicken is golden. Add honey, lemon juice, prunes and 1 cup hot water.
Cover; place in oven. Cook 45 minutes until chicken is cooked through and sauce has a honey-like consistency. Saute almonds in oil. Drain most of oil from pan; add it to the sauce. Place chicken in a serving tagine (or other covered dish), pour sauce on top of it and top with almonds. Serves four. Source: Adapted from chef Ariel Kars and co-owner Patricio Felsenstein, Naomi Grill, Madrid, Spain.
Tuesday, September 20, 2005
Tandoori Fish Kebabs
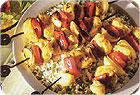 Tandoori Fish Kebabs 4 servings
Ingredients:
- 2 tablespoons fresh lemon juice
- 2 tablespoons plain low-fat yogurt
- 1 tablespoon minced fresh garlic
- 1 tablespoon minced fresh ginger or 1 teaspoon ground ginger
- 1 teaspoon finely chopped fresh green chili pepper
- 1 teaspoon ground cumin
- 1 teaspoon ground coriander
- 1/2 teaspoon ground turmeric (optional)
- 1/4 teaspoon salt
- 1 1/2 pounds firm-fleshed white fish, cut into 1-inch pieces; large shrimp, shelled and deveined; or sea scallops or cod, halibut, or monkfish
- 1 medium onion (8 ounces), cut into 1-inch wedges
- 1 medium red bell pepper (6 ounces), cored, seeded, and cut into 1 1/2-inch squares
2. Heat broiler, setting oven rack 5 inches from heat. Lightly grease four 12- or 14-inch metal skewers. Thread fish alternately with onion and bell pepper on skewers and arrange on rack of broiler plan. Broil kebabs 3 minutes on each side, until fish is firm but still springs back when touched. When kebabs are done, transfer to a warm serving platter and garnish with cilantro and lemon wedges, if desired.
Optional garnishes: Minced fresh cilantro, Lemon wedges
Tips:Serve with sliced cucumbers topped with a dressing of low-fat yogurt and dill.
Wednesday, August 31, 2005
Freezer Safety
- With summer's bounty here, how about a basic course in freezer management. Ruthlessness is paramount: a year is the maximum life for most items, and a freezer isn't a long-term storage unit. In theory, freezing preserves food indefinitely. In fact, for home cooks with residential-grade refrigerators, freezing is a stopgap that slows the aging of food but does not halt it.
- Home freezers should stay well below freezing, at zero or below. Most home freezers, especially those inside refrigerators, are at least 10 above. For every 5 degrees above zero, the life of food is cut in half. Freezer temperatures can be checked easily with an inexpensive refrigerator thermometer from a hardware store.
- Freezer temperatures should be checked every few months. Even if you don't change the setting, a freezer can be 20 degrees warmer in summer than in winter. During a blackout, a home freezer full of food will stay safely frozen for about two days if the door is not opened. (A half-full freezer will last about half as long, and so on.) Food that has visibly thawed should be used or tossed out, but as long as the freezer temperature has not risen above 32 the contents can safely be refrozen.
- Even food that is frozen under ideal conditions does not last forever. Most of it can last a few months at the most before the taste changes. As long as it stays at zero, it's safe, but that doesn't mean it's going to taste good.
- Often, food that has been frozen once can safely be frozen again. But by the time you lift these products from the refrigerated case, they may have already been frozen and thawed at least once, so do not expect fresh flavor or succulent texture if you refreeze them. The Agriculture Department says it is safe to eat meat that has been refrozen, as long as it has never risen above 40 degrees (refrigerator temperature), even during defrosting.
- Chicken, especially, suffers from "drip," the food industry's term for the juices that ooze out of food as it thaws. Unappetizing as it sounds, drip contains the liquid, salts and minerals that give chicken its flavor, and once the thawing releases that liquid, no amount of marinating or brining can bring it back.
- Chicken, pork and fish are best used within six months; they are far less resilient in the freezer than red meats, which can be frozen for a year. Anything more than a year old, except large roasts of meat, should be considered inedible and thrown out.
- SUMMER FRUIT and vegetables can last all winter in the freezer, especially cooked -- recipes with lots of liquid, such as corn chowder, tomato sauce, bean soup and berry compote, are ideal. But raw produce has a more fragile texture that can be ruined by freezing. Vegetables, whether frozen at home or in an industrial plant, can be protected by a quick dip in boiling water, to set the texture and color. Cut them into bite-size pieces beforehand. They should barely cook: The time can range from 90 seconds for spinach and bok choy to three minutes for carrots and Jerusalem artichokes. Next, plunge the vegetables into a bowl of ice water to stop the cooking. Drain well, and freeze.
- Fruit should also be cut up before freezing, though berries can be left whole. Toss each cup of fruit with a scant tablespoon of sugar to reduce browning. (To reduce it more, pack the fruit covered in sugar syrup, made by dissolving sugar in an equal quantity of water until clear.) Fresh herbs do not freeze well, except stick herbs like rosemary and thyme.
- When you plot additions to the freezer, remember that stackable containers, not bags, are the most efficient storage units. When freezing liquids, leave at least half an inch of space at the top of each container -- water expands as it freezes. Freezer bags and containers are worth the extra cost, because their thickness makes them much more airtight than regular plastic products.
- The Agriculture Department insists that for safe defrosting, food must be thawed slowly in the refrigerator, or while tightly wrapped and immersed in cold water. (Microwave defrosting is so variable that the department does not offer guidelines, other than to specify that microwave-defrosted food should be cooked immediately.)
IDEAL FOR FREEZING
Red meat
Butter
Fresh berries
Pesto (without cheese)
Cookie dough
Nuts
Coffee
Whole-grain breads and flours
Soups, stews and pasta dishes
DON'T FREEZE
Mayonnaise
Raw vegetables
Bananas and pineapples
Potatoes, raw or cooked
Sour cream, heavy cream or cream cheese
Fried food
Food with cooked egg white (includes quiches, souffles and meringues)
Tuesday, August 23, 2005
South of the Border Guacamole

South of the Border Guacamole
Ingredients
* ½ Cup chopped white onion
* 4 (or to taste) serrano chilies, chopped
* ¼ Cup chopped cilantro
* 1 tsp salt
* 4 California Avocados
* 2 Tbsp fresh lime juice
* ¾ Cup tomato, seeded and well drained
1. In a food processor, combine onion, chilies, cilantro and salt; reserve. Coarsely mash (DO NOT PUREE) California avocados. Fold in reserved onion mixture, then tomato. Serve with tortilla chips.
2. Guacamole is best made as close to service as possible. Store in an airtight container with plastic wrap against the surface of the guacamole.
Tuesday, August 16, 2005
Linguine & Clam Sauce
LINGUINE AND CLAM SAUCE from the Grand Central Oyster Bar (NYC)
24 cherrystone clams
1 medium onion, minced
1/4 cup extra-virgin olive oil
2 to 4 cloves garlic, minced
1/2 teaspoon crushed red pepper
1/4 teaspoon ground black pepper
1 cup dry white wine
Salt
1 pound linguine
Optional: 1/2 pound steamed rock shrimp, 1/4 cup minced fresh basil, 12 little-neck clams, steamed open
1. Place cherrystone clams in wide-lidded pot with enough water to cover the bottom. Cover pan, turn on heat and bring to a steady simmer. After 5 to 7 minutes, start checking on the clams: you'll want to remove each one as soon as it opens. Every minute or so uncover the pot and, with tongs, remove any clams from shells that open. After 10 minutes or so, all the clams should have opened. Discard any that have not. When clams are cool enough to handle, roughly chop.
2. Strain the clam broth through a fine mesh sieve lined with cheesecloth or 1 ply of a 2-ply paper towel, tilting pan gently to leave most of sand behind.
3. Bring a large pot of salted water to boil for the pasta; you'll want it to be boiling before you finish the dish. While water heats, continue with recipe: Wipe pan clean and add minced onion and olive oil. Saute over medium heat for about 2 minutes, until onion softens and begins to turn translucent, then add garlic. Saute another minute and add crushed red pepper and black pepper. When garlic just starts to brown, add wine and reserved clam juice. Bring to a lively simmer and taste for salt; adjust seasonings.
4. At this point, put the linguine in the boiling water.
5. Add clams and steamed shrimp to the broth mixture and stir until they are warmed through. Turn off the heat, add basil and mix. When linguine is al dente, drain and place in serving bowl. Pour clam sauce over pasta and garnish with optional littlenecks. Makes 4 servings.
Friday, August 12, 2005
Fish Tacos, Pineapple Salsa, Avocado & Corn Salsa
CRISPY SNAPPER TACOS WITH AVOCADO AND TROPICAL-FRUIT SALSA
6 cups plus 6 tablespoons canola or vegetable oil
12 taco shells
1 tablespoon fresh lime juice
4 skinless, boneless red snapper fillets (2 pounds), cut into 1-inch pieces
6 scallions, chopped
2 canned chipotle chilies in adobo, finely chopped
3 cups arugula or watercress, torn into bite-size pieces
3 cups avocado and tropical-fruit salsa
2 cups finely diced tropical fruit such as kiwi, pineapple, mango and papaya
2 California avocados, pitted, peeled, and cut into 1/4-inch dice
1/4 cup fresh cilantro, chopped
1/4 cup finely chopped red onion
1 fresh serrano or jalapeno chili, seeded and finely chopped
2 tablespoons fresh lime juice, or to taste Gently toss together all ingredients with salt and pepper to taste.
Makes about 3 cups of filling. Source: Gourmet, February 2000.
AVOCADO AND CORN SALSA TACO
1 ripe avocado, cut into 1/4 inch dice
2 to 3 tablespoons fresh lime juice
1 ripe red tomato, seeded and cut into 1/4-inch dice
1 ear sweet corn, shucked
1 scallion, both white and green parts, trimmed and finely chopped or 3 tablespoons diced sweet onion
1 to 2 jalapeno peppers or serrano peppers, seeded and minced (for a hotter salsa, leave the seeds in)
1/4 cup chopped fresh cilantro
Coarse salt (kosher or sea) and freshly ground black pepper
1/3 cup sour cream
1/4 cup chopped red onion
3 tablespoons chopped cilantro
1 teaspoon minced canned chipotle chilies, see note
1 (8-ounce) tuna steak, cut into 3/4 inch pieces
1 tablespoon taco seasoning mix
1 tablespoon vegetable oil
4 taco shells
PINEAPPLE SALSA FILLING
2 cups fresh pineapple cut into 1/2 inch cubes
3 tablespoons thinly slivered fresh mint or lemon verbena
1 to 2 jalapeno peppers (preferably red), seeded and minced (for a hotter salsa, leave the seeds in)
2 tablespoons fresh lime juice or more to taste
1 tablespoon light brown sugar or more to taste
6 cups plus 6 tablespoons canola or vegetable oil
12 taco shells
1 tablespoon fresh lime juice
4 skinless, boneless red snapper fillets (2 pounds), cut into 1-inch pieces
6 scallions, chopped
2 canned chipotle chilies in adobo, finely chopped
3 cups arugula or watercress, torn into bite-size pieces
3 cups avocado and tropical-fruit salsa
- Heat six cups oil in a deep large saucepan over moderately high heat until a deep-fat thermometer registers 375 degrees, then fry taco shells, two at a time, turning occasionally, until a shade darker, about one minute. Transfer to paper towels to drain and season with salt.
- Whisk together lime juice, 3 tablespoons oil, and salt and pepper to taste for dressing.
- Season fish with salt and pepper. Heat remaining 3 tablespoons oil in a large nonstick skillet over moderately high heat until hot but not smoking, then saute scallions, stirring, 1 minute. Add fish and saute, stirring occasionally, until just cooked through, about 3 minutes. Remove skillet from heat and gently toss fish with chipotles.
- Toss arugula with dressing and salt and pepper to taste.
- Fill taco shells with arugula, fish mixture and salsa.
- Makes 12 tacos, serving four to six.
2 cups finely diced tropical fruit such as kiwi, pineapple, mango and papaya
2 California avocados, pitted, peeled, and cut into 1/4-inch dice
1/4 cup fresh cilantro, chopped
1/4 cup finely chopped red onion
1 fresh serrano or jalapeno chili, seeded and finely chopped
2 tablespoons fresh lime juice, or to taste Gently toss together all ingredients with salt and pepper to taste.
Makes about 3 cups of filling. Source: Gourmet, February 2000.
AVOCADO AND CORN SALSA TACO
1 ripe avocado, cut into 1/4 inch dice
2 to 3 tablespoons fresh lime juice
1 ripe red tomato, seeded and cut into 1/4-inch dice
1 ear sweet corn, shucked
1 scallion, both white and green parts, trimmed and finely chopped or 3 tablespoons diced sweet onion
1 to 2 jalapeno peppers or serrano peppers, seeded and minced (for a hotter salsa, leave the seeds in)
1/4 cup chopped fresh cilantro
Coarse salt (kosher or sea) and freshly ground black pepper
- Place the avocado in the bottom of a nonreactive mixing bowl and gently toss it with 2 tablespoons of the lime juice. Spoon the tomato on top of the avocado.
- Cut the kernels off the corn. The easiest way to do this is to lay the cob flat on a cutting board and remove the kernels using lengthwise strokes of a chef's knife. Add the corn kernels to the mixing bowl. The salsa can be prepared to this stage up to two hours ahead. Refrigerate it, covered.
- Just before serving, add the jalapeno and cilantro to the mixing bowl and gently toss to mix. Taste for seasoning, adding more lime juice as necessary and season with salt and pepper to taste; the salsa should be highly seasoned.
- Makes 2 to 3 cups. Source: "Indoor! Grilling" by Steven Raichlen (Workman, $18.95).
1/3 cup sour cream
1/4 cup chopped red onion
3 tablespoons chopped cilantro
1 teaspoon minced canned chipotle chilies, see note
1 (8-ounce) tuna steak, cut into 3/4 inch pieces
1 tablespoon taco seasoning mix
1 tablespoon vegetable oil
4 taco shells
- Mix first four ingredients in small bowl. Place tuna in medium bowl; sprinkle with taco seasoning. Heat oil in heavy medium skillet over medium-high heat. Add tuna. Saute to desired doneness, about three minutes for medium. Reduce heat to medium-low. Stir in sour cream mixture. Cook just until heated through, stirring frequently, about two minutes.
- Heat taco shells in microwave 20 seconds. Fill taco shells with tuna mixture.
- Makes 4 servings. Source: Bon Appetit magazine, March 2001.
PINEAPPLE SALSA FILLING
2 cups fresh pineapple cut into 1/2 inch cubes
3 tablespoons thinly slivered fresh mint or lemon verbena
1 to 2 jalapeno peppers (preferably red), seeded and minced (for a hotter salsa, leave the seeds in)
2 tablespoons fresh lime juice or more to taste
1 tablespoon light brown sugar or more to taste
- Place the pineapple, mint, jalapeno, lime juice and brown sugar in a nonreactive mixing bowl, but don't mix them until five minutes before you are ready to serve. Taste for seasoning, adding more lime juice and/or brown sugar as necessary.
- Variation: Slivered mint keeps this salsa in the realm of a salad. If you really want to push the limits, try substituting chopped fresh cilantro for the mint.
- Makes about 2 cups. Source: "Indoor! Grilling" by Steven Raichlen (Workman, $18.95).
Wednesday, August 10, 2005
Cicada Recipes from the Univ of Maryland

The 2nd edition of Cicada-Licious: Cooking and Enjoying Periodical Cicadas was written by Jenna Jadin and published in 2004 by University of Maryland. Sorry I couldn't find a photo of a cooked Cicada dish, you'll have to be happy with the cookbook cover art.
According to the author, it's best to use newly hatched cicadas, because their shells have not hardened. You must blanch the cicadas for 4-5 minutes right after you've collected them to kill any soil bacteria it may carry.
Shanghai Cicadas (4 appetizer-sized servings)
30 newly-emerged cicadas
2 tbps anise seeds
1 tsp salt
2 cups sherry
1 tbsp soy sauce
additional water and sherry or rice wine
10 cloves mashed garlic
celery to garnish
turnip greens to garnish
Directions: 1. Boil the cicadas and anise in salted sherry for five minutes, then remove the cicadas.
2. Saute the mashed garlic and soy sauce, adding enough of equal parts water and sherry to make a thick paste.
3. Deep-fry the cicadas, then skewer them with bamboo picks. Arrange them on a plate with the turnip greens, celery, and garlic paste to look like cicadas climbing out of a mud pie into green foliage.
Saturday, August 06, 2005
Whale, the next Spam
 The British won WWII with American SPAM and Japan sufered defeat with Whale meat. The Japanese post WWII government promoted whale meat as healthy and high in protein. School children often whale meat for lunch. Today, most Japanese do not eat whale meat and consumption is, on average 0.1 gram per day.
Whale meat can be prepared in any number of ways, inlcuding: fried, boiled, as bacon, or as sashimi. A whale lunch costs about $8 - $18, while dinner can cost around $75.
Today, in an effort to introduce children to traditional foods, one school district is serving students whale burger. The Lucky Pierrot burger chain also serves up a whale burger.
Friday, July 15, 2005
How to prepare rotten shark
 I thought this recipe would be very usefull since I tend to have rotten things in my frigidaire. Imagine, I could make "rotten pork chops" or "rotten chicken" or "rotten left over thanksgiving dinner". The recipes are from a great website reachable with a click on Jo's Icelandic Recipes.
**Don't try this at home unless you know what the end product is supposed to taste like. Putrefied shark can become spoiled (imagine that!)
Traditional method:
Take one large shark, gut and discard the innards, the cartilage and the head. Cut flesh into large pieces.Wash in running water to get all slime and blood off. Dig a large hole in coarse gravel, preferably down by the sea and far from the nearest inhabited house - this is to make sure the smell doesn't bother anybody. Put in the shark pieces, and press them well together.
 It's best to do this when the weather is fairly warm (but not hot), as it hastens the curing process. Cover with more gravel and put heavy rocks on top to press down. Leave for 6-7 weeks (in summer) to 2-3 months (in winter). During this time, fluid will drain from the shark flesh, and putrefaction will set in.
When the shark is soft and smells like ammonia, remove from the gravel, wash, and hang in a drying shack. This is a shack or shed with plenty of holes to let the wind in, but enough shade to prevent the sun from shining directly on the shark. Let it hang until it is firm and fairly dry: 2-4 months. Warm, windy and dry weather will hasten the process, while cold, damp and still weather will delay it. Slice off the brown crust, cut the whitish flesh into small pieces and serve, preferably with a shot of ice-cold brennivín.
Modern Method:
The modern method for curing shark relies on putting it into a large container with a drainage hole, and letting it cure as it does when buried in gravel.
Thursday, July 14, 2005
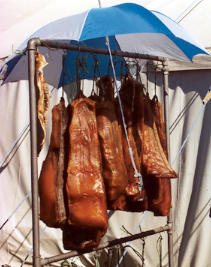
Mr Ed is Dead a receipe for Chargrilled horse fillet
 Chargrilled Fillet of Horse with smoked mushroom oatcakes and a pomegranate molasses
Should anybody, over the next three weeks, exclaim they are so hungry they could eat a horse, have them gallop down to Canvas restaurant in Grantham St, Hamilton, New Zealand. From yesterday until July 31, Canvas (formerly the Museum Cafe) is offering a main course of "Mr Ed is Dead" - a chargrilled fillet of horse - as part of its entry in this year's Monteith's Wild Food Challenge. Owner-chef David Kerr is serving it with smoked mushroom oatcakes, complete with pomegranate molasses.
"We were looking for a point of difference," said Mr Kerr. "Venison, duck and boar doesn't seem that wild these days. The wild food challenge is all about doing something different." He is nervous about offending people. "It's the last thing we want to do, with the Waikato being such a big equestrian centre.
"For horsey people it probably goes against the grain, but they are also interested in trying it. The most common reaction is people are intrigued. They say `aah you're joking', but then think `maybe I'll give it a try'." Mr Kerr can hardly be blamed for pushing the boundaries after patrons licked the plate clean with his huhu grub pate last year.
Horse is lean, low-fat, high-protein meat and tastes like a cross between beef and venison. You can buy it in supermarkets in France, while Mr Kerr's supplier exports to Belgium, where it is a working class delicacy. Should the racing industry completely collapse, Sir Patrick Hogan might like to start revaluing his thoroughbreds on a fillet basis. Mr Ed Is Dead sells for $29 (including a bottle of Monteith's Celtic Red.)
Oyster Stew & Why Oysters are delicious
Oysters get their distinct, delicious flavor from the ocean. There is an etiquette for wading in a tidal basin. I learned it from oyster farmer Stewart Tweed, on the soft edge of Delaware Bay. "Step slowly," he cautioned, "that way we won't stir up the mud too much. We'll be able to see." He was wading in high rubber boots;
An oyster farm is a quiet place with a lot going on, silently. Rows of racks and bags stretch out into the bay, exposed to sun at low tide. It takes two to three years for an oyster to reach market size, time they spend contentedly filtering the briny bay. That afternoon, the oysters were blanching in the sun, which toughens their shells, explained Tweed, who knows a lot about oysters after working more than thirty years as a graduate student at Rutger's Haskin Shellfish Research Laboratory and as a marine extension agent with Rutgers Cooperative Extension. He retired five years ago and is putting his experience to work as an aquaculture extension agent with the New Jersey Sea Grant Program.
Just as a fine wine demonstrates the importance of terroir, the earth that it springs from, oysters may be said to manifest aqua, elements in the marine environment that impart distinctive flavor. Famous ones -- Wellfleet, Blue Points, Kumamoto -- are known for different flavors, textures and degrees of saltiness. As we stood along the shore, Tweed expertly pried apart an oyster bound for market and let me sample it. The taste, warm from the sun, was simultaneously sweet and salty, with a creamy texture -- an exceptional, place-specific, oyster.
During the last decades of the 19th century watermen used sailing sloops and hand tongs or rakes to harvest wild oysters in the country's No. 1 fishing industry. From 1900 to 1940, Cape May Salts from southern New Jersey were shipped by boat and rail to Philadelphia and other major cities. Oyster bars were as common then as pizza parlors are today, and the now-deserted towns of Bivalve and Shellpile on the Delaware Bay were thriving ports.
The mid-1950s marked the beginning of the decline, due to pollution closings of some of the beds, the emergence of oyster-specific diseases such as MSX and Dermo, and plain overharvesting. Motor boats had replaced the sailboats and were able to go out all year long, dredging previously unreachable beds. Today, the farm-raised Cape May Salts are available year-round, thanks to modern refrigeration methods. "We sell them in Ma-r-y, June-r, Ju-r-ly, and Au-r-gust," said Tweed, dispensing the notion that oysters should only be consumed in months that have the letter R in them.
Oyster Stew Makes 4 cups
2 tablespoons unsalted butter
1 teaspoon grated onion or shallot
1 pint oysters with liquor
1 and 1/2 cups milk
1/2 cup cream
1/2 teaspoon salt
1/4 teaspoon white pepper
2 tablespoons chopped parsley
In a heavy 3-quart saucepan, melt the butter and briefly sauté the onion or shallot. Add the oysters, milk, cream and salt and pepper and heat gently just until the oysters float. Overcooking will toughen them. Garnish with the chopped parley and serve with oyster crackers. [org pub Pa's Centre Daily by Anne Quinn Corr]
Wednesday, July 13, 2005
I'll have the overfished salmon, 3 tasty ways
I was going to make a witty comment or two, but I don't think it's necessary. From the Albuerque Journal:
POLYNESIAN SALMON ON TOAST POINTS</span>
1 1/2 pounds of salmon fillets
2 tablespoons shallots
2 tablespoons garlic
1 cup white wine
POLYNESIAN SAUCE:
1 teaspoon fresh ginger, ground
1 1/2 cups mango slices
1 1/2 cups papaya slices
1 cup raisins or grapes
Grill salmon over a high flame to sear in flavor, but don't cook all the way through. Then poach til it's done to your liking in a pan with the shallots, garlic and white wine. Chill. Mix the sauce ingredients together in a pan and bake at 350 degrees for 25 minutes. Chill. Cut the chilled salmon into pieces small enough to fit on small pieces of toast, and cover with the chilled Polynesian sauce. Serve. Serves 20
GRILLED TILAPIA IN PAPILLOTE
4 tilapia fillets, about 2 ounces each
1/3 cup red onion, sliced
1/3 cup mushroom, sliced
1/3 cup red bell pepper, sliced
1/3 cup yellow squash, sliced
1/3 cup zucchini, sliced
1/2 teaspoon fresh shaved ginger
4 tablespoons butter
Salt, pepper and cilantro (to taste)
Tear off pieces of foil large enough to wrap loosely around each fillet, creating a tent. Line the bottom of each tent with pats of butter. Place a quarter of the sliced vegetables directly on the butter on each piece of foil and add salt, pepper and cilantro to taste.
Lay one fish fillet on top of the veggies and seal the foil all the way around, leaving an opening at the top for steam to escape. Place tents on the grill over medium heat until done, or about 10 minutes per inch of thickness measured at the thickest part of the fillet. Serves 4.
ALASKAN SALMON STIR-FRY WITH BOK CHOY AND ASPARAGUS
6 ounces Alaskan salmon fillets
12 spears fresh asparagus, tips only
1 small head bok choy, diced
1/2 small white onion, diced
1/2 small carrot, diced
1/2 small red bell pepper, diced
4 fresh button mushrooms, sliced
2 teaspoons fresh ginger, diced
2 teaspoons fresh garlic, minced
2 tablespoons sesame oil
SAUCE:
1/4 cup oyster sauce
1 cup dark soy sauce
1 teaspoon red Asian chile sauce
1 tablespoon salt
1 tablespoon corn starch
1/4 cup cold water
Arrange vegetables on a large sheet pan in piles. Poach or steam salmon until cooked. Place in refrigerator until chilled and then break into small pieces. Combine sauce ingredients into small bowl. Heat wok to high and add sesame oil, ginger and garlic, leaving them in the oil to brown. Add carrots and cook 15 seconds; add white onion, cook 15 seconds; add bell pepper and cook 15 seconds. Add the remaining vegetables and cook all together until asparagus is bright green. Add salmon pieces and sauce mixture. Stir just to coat and remove from heat. Serve over wild rice, jasmine rice or vermicelli.
"Not that many years ago, people thought the oceans could feed the entire world population. They were wrong! Today 70% of the world's fisheries are fully deplete or nearly fished out....commercial fishers are going after the estimated last 10% of the world's cod....bycatch is 4 times greater than the entire catch....fish farming is bad too."Wow. What am I to do? Should I become a vegitarian or cook up "the tempting seafood dishes" from the article?
POLYNESIAN SALMON ON TOAST POINTS</span>
1 1/2 pounds of salmon fillets
2 tablespoons shallots
2 tablespoons garlic
1 cup white wine
POLYNESIAN SAUCE:
1 teaspoon fresh ginger, ground
1 1/2 cups mango slices
1 1/2 cups papaya slices
1 cup raisins or grapes
Grill salmon over a high flame to sear in flavor, but don't cook all the way through. Then poach til it's done to your liking in a pan with the shallots, garlic and white wine. Chill. Mix the sauce ingredients together in a pan and bake at 350 degrees for 25 minutes. Chill. Cut the chilled salmon into pieces small enough to fit on small pieces of toast, and cover with the chilled Polynesian sauce. Serve. Serves 20
GRILLED TILAPIA IN PAPILLOTE
4 tilapia fillets, about 2 ounces each
1/3 cup red onion, sliced
1/3 cup mushroom, sliced
1/3 cup red bell pepper, sliced
1/3 cup yellow squash, sliced
1/3 cup zucchini, sliced
1/2 teaspoon fresh shaved ginger
4 tablespoons butter
Salt, pepper and cilantro (to taste)
Tear off pieces of foil large enough to wrap loosely around each fillet, creating a tent. Line the bottom of each tent with pats of butter. Place a quarter of the sliced vegetables directly on the butter on each piece of foil and add salt, pepper and cilantro to taste.
Lay one fish fillet on top of the veggies and seal the foil all the way around, leaving an opening at the top for steam to escape. Place tents on the grill over medium heat until done, or about 10 minutes per inch of thickness measured at the thickest part of the fillet. Serves 4.
ALASKAN SALMON STIR-FRY WITH BOK CHOY AND ASPARAGUS
6 ounces Alaskan salmon fillets
12 spears fresh asparagus, tips only
1 small head bok choy, diced
1/2 small white onion, diced
1/2 small carrot, diced
1/2 small red bell pepper, diced
4 fresh button mushrooms, sliced
2 teaspoons fresh ginger, diced
2 teaspoons fresh garlic, minced
2 tablespoons sesame oil
SAUCE:
1/4 cup oyster sauce
1 cup dark soy sauce
1 teaspoon red Asian chile sauce
1 tablespoon salt
1 tablespoon corn starch
1/4 cup cold water
Arrange vegetables on a large sheet pan in piles. Poach or steam salmon until cooked. Place in refrigerator until chilled and then break into small pieces. Combine sauce ingredients into small bowl. Heat wok to high and add sesame oil, ginger and garlic, leaving them in the oil to brown. Add carrots and cook 15 seconds; add white onion, cook 15 seconds; add bell pepper and cook 15 seconds. Add the remaining vegetables and cook all together until asparagus is bright green. Add salmon pieces and sauce mixture. Stir just to coat and remove from heat. Serve over wild rice, jasmine rice or vermicelli.
Subscribe to:
Posts (Atom)